Azure shared disks – Failover Clustered Instance – SQL Server 2016

In my last post, I wrote about a new option in Azure – shared disks. Have you ever needed to build a Failover Cluster Instance (FCI) in Azure? This post will provide a few steps to get you started. To follow along with the demo, you’ll need an Azure account (available for free here ) and some familiarity with the Azure CLI ( https://bit.ly/3jIPIld ). I’m using the cli commands, for most of the setup for repeatability. We’ll build a two node SQL Server 2016 failover clustered instance using premium shared disks.
Requirements
The following requirements are needed. More information on how to setup a domain controller in Azure can be found here.
- Visual Studio Code – Not a requirement, but provides intellisense for Azure CLI. The following extensions were installed as well.
- Azure Account
- Azure CLI Tools
- Azure account
- Resource group
- Virtual Network
- Virtual machine as the domain controller
- Storage account which can be used as the cloud witness for the FCI
- Two Azure VMs running Windows Server 2019
- Azure availability set
- Proximity group
We’ll assume the resource group, virtual network, domain controller, and storage account (to be used as the cloud witness), are already in place within a region which currently supports premium shared disks. Check here for a list of regions which currently support premium shared disks. You’ll also need to request access to try premium shared disks. (https://aka.ms/AzureSharedDiskGASignUp)
Proximity placement group
My demo virtual network and domain controller currently reside within the West Central US region. Placing the clustered virtual machines within a proximity placement group achieves the lowest possible latency between the two. This is a logical grouping to make sure Azure compute resources are located close to each other. For more information, see here.
After logging into your account, using Azure CLI (https://bit.ly/3ib2I2F) and setting your subscription using “az account set”, create the proximity group.
az ppg create --name SERO_FCI_PPG --location westcentralus --type standard --resource-group SERO_FCI_RG --tags "Purpose=FCI Demo"Availability Set
Next, we need to create an availability set. An availability set is a logical group in Azure to ensure VM resources are isolated from each other and utilize separate physical servers, compute racks, storage units, and network switches. By using an availability set and FCI, we can ensure one node will be online during typical maintenance, such as patching, and reduce impact of single points of failure. However, an availability set does not provide data center redundancy. For more information, see here and here. The script below creates an availability set which uses 1 platform fault domain and 1 platform update domain.
az vm availability-set create --name SERO_FCI_AvailabilitySet --resource-group SERO_FCI_RG --location westcentralus --platform-fault-domain-count 1 --platform-update-domain-count 1 --tags "Purpose=FCI Demo" --ppg SERO_FCI_PPG
Virtual Machines
With the proximity group and availability set in place, we’re now ready to create our virtual machines. I’m using the Standard_D2s_v3 VM size and a few variables to avoid repeating them for each vm creation script. You could use a loop here as well. Be sure to update the values to match your environment.
availabilityset="SERO_FCI_AvailabilitySet"
adminusername="yourAdminUserName"
resourcegroup="SERO_FCI_RG"
imagevar="Win2019Datacenter"
vnetname="SERO_FCI_WESTCENTRALUS_NETWORK"
subnetvar="Internal"
sizevar="Standard_D2s_v3"
tagvar="Purpose=FCI Demo"
proximitygroup="SERO_FCI_PPG"
az vm create --name SEROFC1 --admin-username $adminusername --resource-group $resourcegroup --image $imagevar --vnet-name $vnetname --nsg '' \
--subnet $subnetvar --size $sizevar --tags $tagvar --availability-set $availabilityset --public-ip-address '' --ppg $proximitygroup
az vm create --name SEROFC2 --admin-username $adminusername --resource-group $resourcegroup --image $imagevar --vnet-name $vnetname --nsg '' \
--subnet $subnetvar --size $sizevar --tags $tagvar --availability-set $availabilityset --public-ip-address '' --ppg $proximitygroup
Add VMs to your domain
At this stage, go ahead and add the virtual machines to the domain and apply the latest updates. If your network restricts port access between machines on the same network, you may need to adjust your network security groups and the windows firewall. For this demo, I’ve disabled the windows firewall (disclaimer: not best practice and should be avoided in a real world scenario).
Create the premium shared disk
Now the exciting part :). Save the following json and modify to match your environment and the size of disk you wish to use. I saved the file as ShardDiskConfig.json.
{
  "$schema": "https://schema.management.azure.com/schemas/2019-04-01/deploymentTemplate.json#",
  "contentVersion": "1.0.0.0",
  "parameters": {
    "dataDiskName": {
      "type": "string",
      "defaultValue": "SEROFCI_SharedDisk"
    },
    "dataDiskSizeGB": {
      "type": "int",
      "defaultValue": 256
    },
    "maxShares": {
      "type": "int",
      "defaultValue": 2
    }
  },
  "resources": [
    {
      "type": "Microsoft.Compute/disks",
      "name": "[parameters('dataDiskName')]",
      "location": "[resourceGroup().location]",
      "apiVersion": "2019-07-01",
      "sku": {
        "name": "Premium_LRS"
      },
      "properties": {
        "creationData": {
          "createOption": "Empty"
        },
        "diskSizeGB": "[parameters('dataDiskSizeGB')]",
        "maxShares": "[parameters('maxShares')]"
      }
    }
  ]
}
Next, create the shared disk using the “az deployment group create” command and the config saved within the json file.
az deployment group create --resource-group SERO_FCI_RG --template-file /Users/lukecampbell/OneDrive/Lab/SharedDiskConfig.json
Attaching the shared disk
Next, we’ll need to attach the newly created shared disk to both of the virtual machines. Modify the values below to match your environment.
resourcegroup="SERO_FCI_RG"
location="westcentralus"
proximitygroup="SERO_FCI_PPG"
diskId=$(az disk show -g $resourcegroup -n SEROFCI_SharedDisk --query 'id' -o tsv)

az vm disk attach --resource-group $resourcegroup --vm-name SEROFC1 --name $diskId
az vm disk attach --resource-group $resourcegroup --vm-name SEROFC2 --name $diskId
Format shared disk
Now we’ll need to initialize the attached disk as a GPT partition and format using NTFS. This can be done using the Azure CLI or Powershell commandlets. I opted to remote into each VM and format using the disk management utility. No need to assign a drive letter at this step.
Create the failover cluster
We’re ready to create the failover cluster. If you’re familiar with creating clusters on premises, this is no different. However, since we’re setting up a SQL Server 2016 FCI, we’ll need to create a Azure internal load balancer (ILB) to hold the IP address of the virtual network name in which the SQL Server instance listens on. I won’t cover the cluster creation in detail here but the following is a summary of the steps required:
- Install the failover cluster feature and management tools on both VMs.
- Create the cluster
- Add the shared disk to the cluster. I’ve assigned drive letter F to this disk.
One important note. The cluster will be created using a Distributed Network Name by default. SQL Server 2016 does not support DNN access points. By using the powershell statement below, you can create the cluster and a virtual network name instead.
New-Cluster -Name <FailoverCluster-Name> -Node ("<node1>","<node2>") –StaticAddress <n.n.n.n> -NoStorage -ManagementPointNetworkType SingletonThe new switch, ManagementPointNetworkType, allows you to specify either of the following values:
- Singleton: Use the traditional method of DHCP or static IP address.
- Distributed: Use a Distributed Network Name using node IP addresses.
- Automatic: Use detection. If running in Azure, use Distributed; if running on-premises, use Singleton (the default).
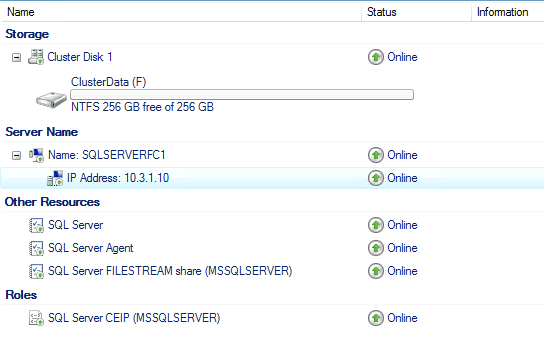
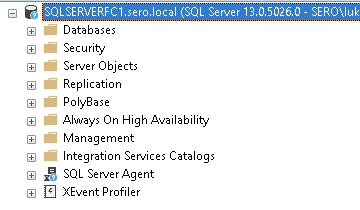
SQL Server 2016 install
Install SQL Server 2016 using the failover cluster installation wizard on both VMs. Assign an IP address for the virtual network name. Again, these steps are the same as when creating a FCI on premises. Below is a screenshot of the end result for my installation.
Load balancer
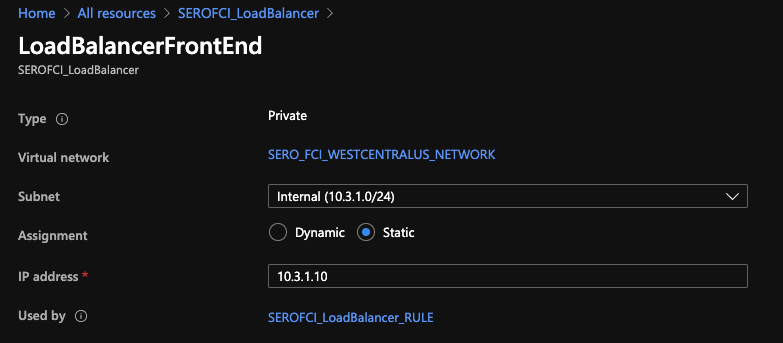
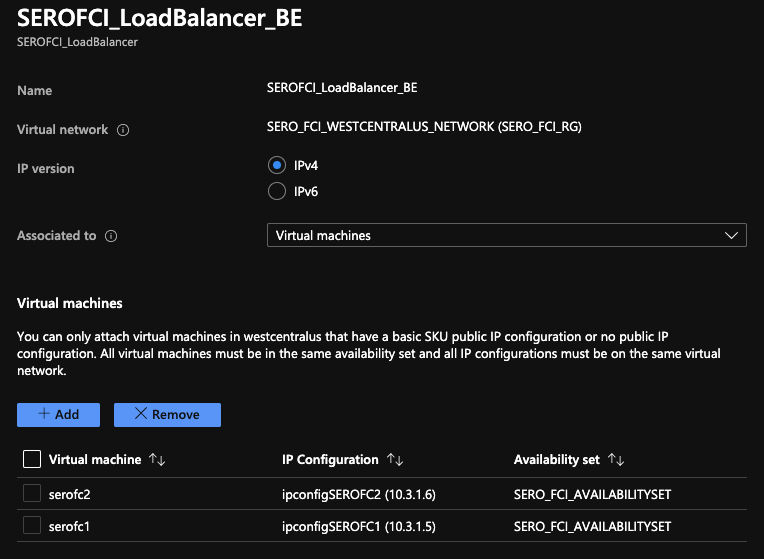
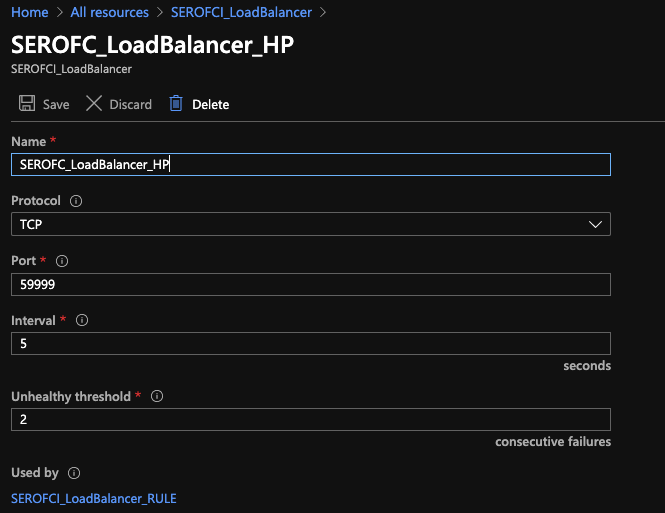
At this point, you should have a fully functional FCI. However, you won’t be able to connect remotely yet. We need to configure an Azure Load Balancer to hold the IP address assigned to the virtual network name of the FCI. The load balancer will route traffic to the primary node in the FCI. These steps could be achieved using the Azure CLI if needed. I opted to use the Azure portal following the steps provided here and create a basic ILB.
- Frontend IP configuration (IP Address should match the IP address of the FCI virtual network name).
2. Backend pool – Contains the virtual machines hosting the FCI.
3. Health probes
4. Load balancing rules
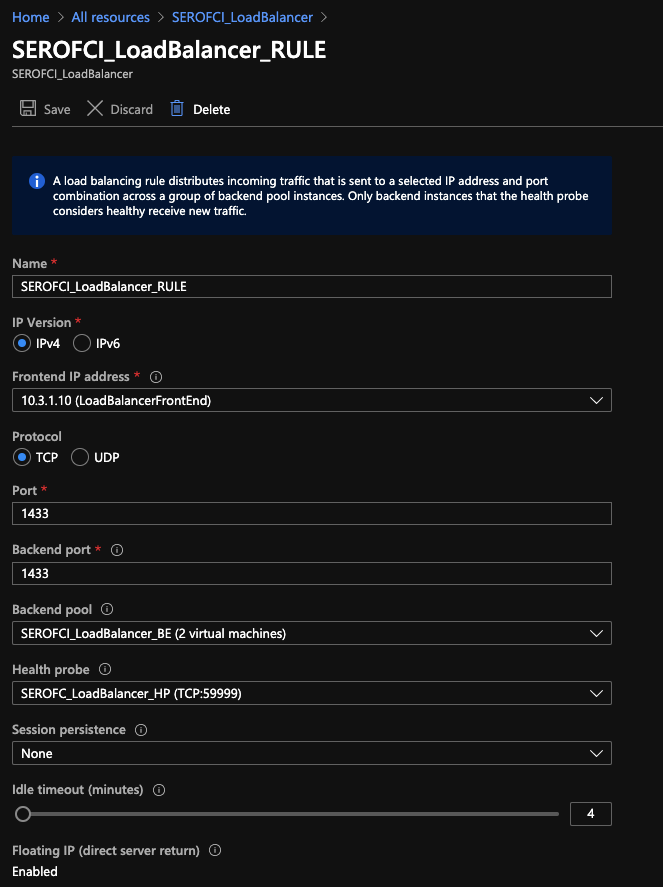
After the load balancer has been configured, be sure to modify and run the powershell script here. The probe port must match the port provided when creating the health probes for the ILB. In this example, we used port 59999. If you have any issues with failovers, check all firewalls (both windows and the network security group rules in Azure). The script below is what I used when creating the demo. This only needs to be executed on one of the cluster nodes. Once completed, take the FCI offline and online again for the settings to take effect.
$ClusterNetworkName = "Cluster Network 1"
$IPResourceName = "SQL IP Address 1 (SQLSERVERFC1)"
$ILBIP = "10.3.1.10"
[int]$ProbePort = 59999

Import-Module FailoverClusters

Get-ClusterResource $IPResourceName | Set-ClusterParameter -Multiple @{"Address"="$ILBIP";"ProbePort"=$ProbePort;"SubnetMask"="255.255.255.255";"Network"="$ClusterNetworkName"
;"EnableDhcp"=0}
Connecting to the FCI
I verified connectivity to the FCI by installing SQL Server Management Studio on a third VM.
Failover to test connectivity.
Conclusion
I’m excited to see shared disks as an available option in Azure. We’ll build on this series next week by creating a SQL Server 2019 FCI and utilize the new distributed network name feature vs the load balancer. Let us know your thoughts regarding this option for high availability and if it’s something you may be interested in leveraging in the future.
Thanks for reading!
Recent Comments